1. 环境准备

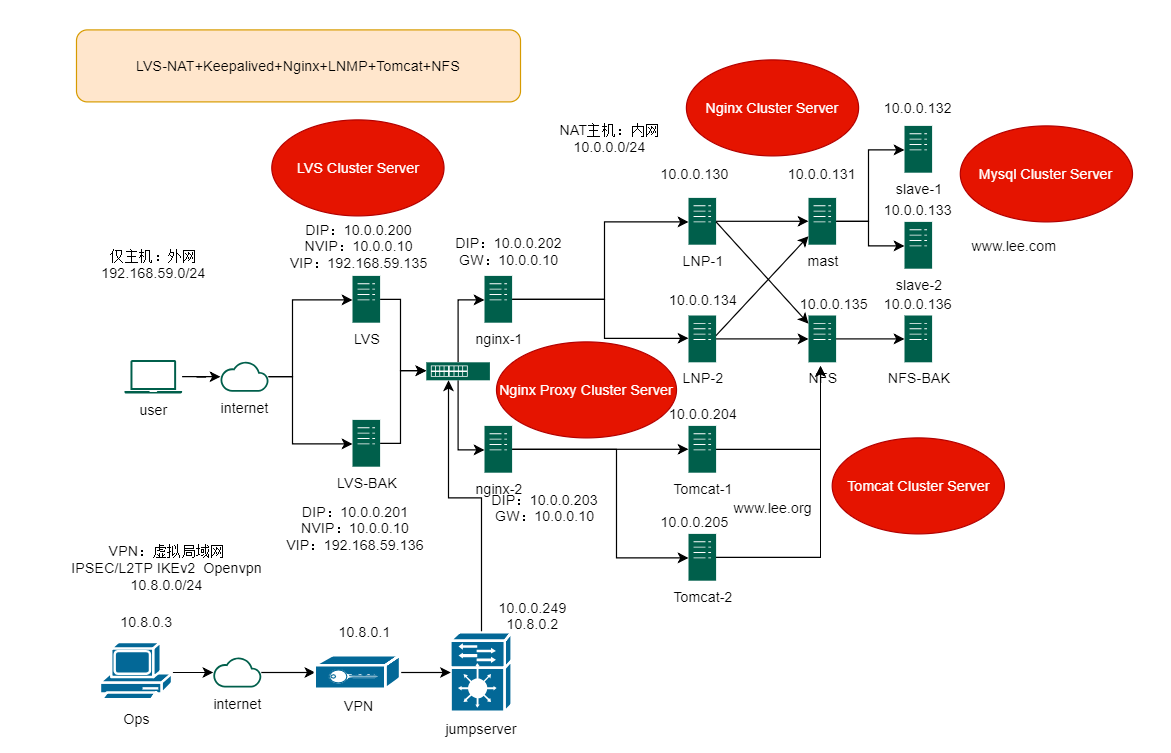
多线程CPU和Vmware,虚拟机操作系统限ubuntu和centos,具体看命令配置即可知道,架构图如下

高可用

IP分配无

注意事项

  1. 关闭selinux和防火墙还有把默认表清空一下,实际生产案例可能会配置专有端口,这个自己注意
  2. NAT和仅主机仅仅是模拟内外网不同网段,一定要理解含义
  3. 这里只使用了LVS-NAT负载均衡转发,DR多网段和tunnel模式可参考我前面写的修改,删除和增加部分网络参数即可
  4. 默认使用ROOT用户
  5. 一步一步来,喝杯咖啡

普及下LVS和Nginx

  1. 四层转发不握手
  2. 七层转发需要握手
  3. LVS只支持四层转发
  4. nginx支持七层和虚拟四层转发
  5. LVS基于内核转发,LVS适合高并发,大规模的网络负载均衡场景
  6. nginx更适合HTTP转发

2. LVS配置

1
2
3
4
5
6
7
8
9
10
11
12
13
14
15
16
17
18
19
20
21
22
23
24
25
26
27
28
29
30
31
32
33
34
35
36
37
38
39
40
41
42
43
44
45
46
47
48
49
50
51
52
53
54
55
56
57
58
59
60
61
62
63
64
65
66
67
68
69
70
71
72
73
74
75
76
77
78
79
80
81
82
83
84
85
86
87
88
89
90
91
92
93
94
95
96
97
98
99
100
101
102
103
104
105
106
107
108
109
110
111
112
113
114
115
116
117
118
119
120
121
122
123
124
125
126
127
128
129
130
131
132
133
134
135
136
137
138
139
140
141
142
143
144
145
146
147
148
149
150
151
152
153
154
155
156
157
158
159
160
161
162
163
164
165
166
167
168
169
170
171
172
173
174
175
176
177
178
179
systemctl stop firewalld
iptables -F
systemctl disable firewalld
hostnamectl set-hostname LVS
#添加第二块网卡,这里偷懒使用自动获取的IP,格式如下
#centos网卡配置
NAME=ens160
#我这是ens160,这个名是别名,但也是命令行操作网卡的名称
DEVICE=ens160
BOOTPROTO=static
#这里写none也ok,意思是静态配置,如果为dhcp则是自动获取
IPADDR=10.0.0.100
GATEWAY=10.0.0.2
NETMASK=255.255.255.0
#PREFIX=CIDR MASK,掩码两种格式,3个255为24
DNS=you dns
DNS1=you dns1
ONBOOT=yes
#开启启动

#ubuntu网卡配置 这里注意,ubuntu是用的netplan管理网卡,格式是yaml,需要注意层级格式
network:
ethernets:
ens33:
dhcp4: false
#这里改为no也行
addresses:
- 10.0.0.100/24
gateway4: 10.0.0.2
nameservers:
addresses: [10.0.0.2,223.5.5.5]
version: 2

#网卡2同理,网卡名不同而已,注意层级格式就ok,这里就不在过多赘述
mount /dev/cdrom /mnt
yum install ipvsadm keepalived -y
#这里采用源安装,如果是其他方式安装请注意路径
echo "1" > /proc/sys/net/ipv4/ip_forward
#这里是临时生效,永久生效请写sysctl配置文件
vim /etc/keepalived/keepalived.conf
#这里要注意,默认配置文件名不可自定义,为keepalived.conf,如需自定义请使用keepalived -f /you/config/path
global_defs {
#全局配置
notification_email {
you.example@mail.com
}
notification_email_from you.example@mail.com
smtp_server mail.domob.cn
smtp_connect_timeout 30
#邮箱配置
router_id LVS_1
#唯一性
}
vrrp_instance VI_1 {
#节点配置
state MASTER
#主为MASTER,备为BACKUP
interface ens224
#绑定的网卡
virtual_router_id 51
#组ID,同一组的主备需一样
priority 100
#启动时的优先级谁高则谁成为MASTER
advert_int 1
#主备同步检查,默认1秒
authentication {
#主备之间认证,防止其他节点窜入
auth_type PASS
auth_pass 1111
}
virtual_ipaddress {
#对外公网IP
192.168.59.135
#LVS主IP
192.168.59.136
#LVS备IP
}
}
vrrp_instance LAN_GATEWAY {
#内网定义
state MASTER
interface ens160
virtual_router_id 62
priority 100
#NVIP漂移地址,一定要和启动优先级一样,不然我估计会出错
advert_int 1
authentication {
auth_type PASS
auth_pass 1111
}
virtual_ipaddress {
10.0.0.10
#NVIP,漂移VIP
}
}
virtual_server 192.168.59.135 80{
#主机配置
delay_loop 6
#健康检查间隔6秒
lb_algo rr
#LVS调度算法为rr也就是轮询。rr|wrr|lc|wlc|lblc|sh|dh
lb_kind NAT
#负载均衡转发规则为NAT。DR|TUN|FULLTUN
!nat_mask 255.255.255.0
#我在ubuntu上可指定掩码,rokey上检查时会报错,所以我注释了,无伤大雅
persistence_timeout 50
#50秒内访问同一台后端服务器,可注释
protocol TCP
#协议为TCP

real_server 10.0.0.202 80 {
#后端真实服务器配置
weight 1
#权重
TCP_CHECK {
connect_timeout 10
#连接超时时间
!nb_get_retry 3
#重连次数,这里检查配置时也出错,干脆注释了
delay_before_retry 3
#重连间隔时间
connect_port 80
#健康检查时的端口
}
}
real_server 10.0.0.203 80 {
weight 1
TCP_CHECK {
connect_timeout 10
!nb_get_retry 3
delay_before_retry 3
connect_port 80
}
}
}
virtual_server 192.168.59.136 80{
delay_loop 6
lb_algo rr
lb_kind NAT
!nat_mask 255.255.255.0
persistence_timeout 50
protocol TCP

real_server 10.0.0.202 80 {
weight 1
TCP_CHECK {
connect_timeout 10
!nb_get_retry 3
delay_before_retry 3
connect_port 80
}
}
real_server 10.0.0.203 80 {
weight 1
TCP_CHECK {
connect_timeout 10
!nb_get_retry 3
delay_before_retry 3
connect_port 80
}
}
}
#然后配置文件是叹号注释,写#纯属习惯

keepalived -t
#检查配置文件,没有输出则正确。默认为/etc/keepalived/keepalived.conf,可自定义路径
systemctl start keepalived
systemctl status keepalived
#这里应看到以下信息,备用机则会显示remove VIPs。这里是根据启动优先级来决定谁是主备,而不是MSTER,BACKUP名称来决定,NVIP也是根据优先级
LVS Keepalived_vrrp[949]: (LAN_GATEWAY) Entering MASTER STATE
LVS Keepalived_vrrp[949]: (LAN_GATEWAY) setting VIPs.
LVS Keepalived_vrrp[949]: (LAN_GATEWAY) Sending/queueing gratuitous ARPs on ens160 for 10.0.0.10
LVS Keepalived_vrrp[949]: Sending gratuitous ARP on ens160 for 10.0.0.10
ipvsadm -Ln
#keepalived配置里会自动配置ipvsadm,所以输入命令可直接查看
systemctl stop keepalived
#如果你停止服务,那么备用机会立马抢占NVIP,成为新的MASTR进行转发服务
echo -e "10.0.0.202 www.lee.com\n10.0.0.203 www.lee.org" >> /etc/hosts

3. LVS-BAK配置

1
2
3
4
5
6
7
8
9
10
11
12
13
14
15
16
17
18
19
20
21
22
23
24
25
26
27
28
29
30
31
32
33
34
35
36
37
38
39
40
41
42
43
44
45
46
47
48
49
50
51
52
53
54
55
56
57
58
59
60
61
62
63
64
65
66
67
68
69
70
71
72
73
74
75
76
77
78
79
80
81
82
83
84
85
86
87
88
89
90
91
92
93
94
95
96
97
98
99
100
101
102
103
104
105
106
107
108
109
110
111
hostnamectl set-hostname LVS-BAK
systemctl stop firewalld
systemctl disable firewalld
iptables -F
#ip配置同LVS
mount /dev/sr0 /mnt/
#sr0和cdrom都是指光盘的意思,因为我挂了光盘的原因,安装软件会报错,所以必须挂载,没有装AUTO挂载
yum -y install ipvsadm keepalived
echo "1" > /proc/sys/net/ipv4/ip_forward
vim /etc/keepalived/keepalived.conf
global_defs {
notification_email {
you.example@mail.com
}
notification_email_from you.example@mail.com
smtp_server mail.domob.cn
smtp_connect_timeout 30
router_id LVS_2
#唯一标识
}
vrrp_instance VI_1 {
state BACKUP
#备份
interface ens224
virtual_router_id 51
priority 99
#优先级不能超过MASTER,不然VIP会漂移过来
advert_int 1
authentication {
auth_type PASS
auth_pass 1111
}
virtual_ipaddress {
192.168.59.135
192.168.59.136
}
}
vrrp_instance LAN_GATEWAY {
state BACKUP
interface ens160
virtual_router_id 62
priority 99
advert_int 1
authentication {
auth_type PASS
auth_pass 1111
}
virtual_ipaddress {
10.0.0.10
}
}
virtual_server 192.168.59.135 80{
delay_loop 6
lb_algo rr
lb_kind NAT
!nat_mask 255.255.255.0
persistence_timeout 50
protocol TCP

real_server 10.0.0.202 80 {
weight 1
TCP_CHECK {
connect_timeout 10
!nb_get_retry 3
delay_before_retry 3
connect_port 80
}
}
real_server 10.0.0.203 80 {
weight 1
TCP_CHECK {
connect_timeout 10
!nb_get_retry 3
delay_before_retry 3
connect_port 80
}
}
}
virtual_server 192.168.59.136 80{
delay_loop 6
lb_algo rr
lb_kind NAT
!nat_mask 255.255.255.0
persistence_timeout 50
protocol TCP

real_server 10.0.0.202 80 {
weight 1
TCP_CHECK {
connect_timeout 10
!nb_get_retry 3
delay_before_retry 3
connect_port 80
}
}
real_server 10.0.0.203 80 {
weight 1
TCP_CHECK {
connect_timeout 10
!nb_get_retry 3
delay_before_retry 3
connect_port 80
}
}
}

keepalived -t
systemctl start keepalived
systemctl status keepalived
ipvsadm -Ln
echo -e "10.0.0.202 www.lee.com\n10.0.0.203 www.lee.org" >> /etc/hosts

4. Nginx-1配置

1
2
3
4
5
6
7
8
9
10
11
12
13
14
15
16
17
18
19
20
21
22
23
24
25
26
27
28
29
30
31
32
33
34
35
36
hostnamectl set-hostname Nginx-1
systemctl stop firewalld
systemctl disable firewalld
iptables -F
#一定要关闭selinux
mount /dev/cdrom /mnt
#因为我写了本地yum仓配置,又没装auto挂载,所以需要手动挂载,可以安装软件包的话,就忽略这步
yum install nginx -y
#这里就源安装了,如果是编译安装,请注意自己自己的配置
route del default
#删除默认路由,临时删除,重启会重新生成,主要是改文件比较烦
route add default gw 10.0.0.10
#添加到LVS的默认路由
route -n
#查看路由
vim /etc/nginx/conf.d/10.0.0.130.conf
#名字随意,需.conf结尾
upstream wordpress {
server 10.0.0.130;
#这里是后端的wordpress,默认算法是轮询,权重都为1
server 10.0.0.134;
}

server{
listen 80 default_server;
#这里配置为默认主页,检查配置时如果报错请删除其他文件的default_server即可
server_name www.lee.com;
#配置域名解析,感兴趣的可自行配置,2种方法,一是搭建DNS server,二是直接在hosts文件添加解析
location / {
proxy_pass http://wordpress;
#反代后端wordpress服务器
}
nginx -t
nginx -s reload
#这里没有编译安装nginx,如果是编译安装,配置文件目录可能不同,请注意
echo -e "10.0.0.202 www.lee.com\n10.0.0.203 www.lee.org" >> /etc/hosts

5. Nginx-2配置

1
2
3
4
5
6
7
8
9
10
11
12
13
14
15
16
17
18
19
20
21
22
hostnamectl set-hostname Nginx-2
systemctl stop firewalld
systemctl disable firewalld
iptables -F
mount /dev/cdrom /mnt
yum install nginx -y
vim /etc/nginx/conf.d/10.0.0.204.conf
upstream jpress{
server 10.0.0.204:8080;
#这里是后端的jpress
server 10.0.0.205:8080;
}
server{
listen 80 default_server;
server_name www.lee.org;
location / {
proxy_pass http://jpress;
}
}
nginx -t
nginx -s reload
echo -e "10.0.0.202 www.lee.com\n10.0.0.203 www.lee.org" >> /etc/hosts

6. LNP-1配置

1
2
3
4
5
6
7
8
9
10
11
12
13
14
15
16
17
18
19
20
21
22
23
24
25
26
27
28
29
30
31
32
33
34
35
36
37
38
39
40
41
42
43
44
45
46
47
48
49
50
51
52
53
54
55
56
57
58
59
60
61
62
63
64
65
66
67
hostnamectl set-hostname LNP-1
systemctl stop ufw
#ubuntu默认防火墙是ufw
systemctl disable ufw
iptables -F
#-F是清空filter表所有规则,流量信息等,如果你其他表有规则,请注意是否冲突
apt install nginx php-fpm php-mysql php-json unzip -y
#安装若干软件
rm -rf /etc/nginx/sites-enabled/default
#改default_server还是提示冲突,我直接删
vim /etc/nginx/conf.d/sever130.conf
server{
listen 80;
root /data/wordpress/www;
index index.php;
client_max_body_size 20m;
#限制客户端上传文件大小,不配置为不限制
location ~ \.php$|/ping|/php_status{
#正则匹配以.php,.ping,.php_status结尾
fastcgi_pass 127.0.0.1:9000;
#php监控端口,可统一更改为socket路径
fastcgi_param SCRIPT_FILENAME $document_root$fastcgi_script_name;
#指定了FastCGI处理程序需要执行的脚本路径
include fastcgi_params;
#这个是相对路径,也可绝对路径。fastcgi_params文件会包含一些常用的FastCGI参数配置
}
}

#php配置
vim /etc/php/8.1/fpm/pool.d/www.conf
;listen = /run/php/php8.1-fpm.sock
#这个是socket路径,这里就演示端口了
listen = 127.0.0.1:9000
#可修改0.0.0.0,或者在nginx改为进程文件
pm.status_path = /php_status
#php部分数据监控
ping.path = /ping
#检查php存活

vim /etc/php/8.1/fpm/php.ini
post_max_size = 100M
upload_max_filesize = 100M
#这里是修改上传文件限制

mkdir -p /data/wordpress/www
vim /data/wordpress/www/phpinfo.php
<?php
phpinfo();
?>
#测试php是否被解析
systemctl start nginx
systemctl start php8.1-fpm

### wordpress配置
wget https://wordpress.org/latest.zip
chown www-data.www-data wordpress -R
mv wordpress/* /data/wordpress/www
#配置完mysql,然后输入本机IP,可以配置wordpress站点了,实测上传大于20mb的文件会出现json错误,需要在NGINX配置文件将client_max_body_size改成你想要的大小,我改成了100就行了

#NFS做完开始在这里挂载
rsync -a /data/wordpress/www/* root@10.0.0.135:/data/wordpress/www/
#rsync默认递归复制,可 --no-recursion 取消递归,这里把文件复制到NFS
rm -rf /data/wordpress/www/*
echo "10.0.0.135:/data/wordpress/www /data/wordpress/www/ nfs _netdev 0 0" >> /etc/fstab
#这里注意别清空了,两个大于号要看清
mount -a
#挂载fstab文件

7. LNP-2配置

1
2
3
4
5
6
7
8
9
10
11
12
13
14
15
16
17
18
19
20
21
22
23
24
25
26
27
28
29
30
31
32
33
34
35
36
37
38
39
40
41
42
43
hostnamectl set-hostname LNP-2
systemctl stop ufw
systemctl disable ufw
iptables -F
apt install nginx php-fpm php-mysql php-json -y
rm -rf /etc/nginx/sites-enabled/default
vim /etc/nginx/conf.d/sever130.conf
server{
listen 80;
root /data/wordpress/www;
index index.php;
client_max_body_size 20m;
#限制客户端上传文件大小,不配置为不限制
location ~ \.php$|/ping|/php_status{
fastcgi_pass 127.0.0.1:9000;
fastcgi_param SCRIPT_FILENAME $document_root$fastcgi_script_name;
include fastcgi_params;
}
}

php
vim /etc/php/8.1/fpm/pool.d/www.conf
;listen = /run/php/php8.1-fpm.sock
listen = 127.0.0.1:9000
pm.status_path = /php_status
ping.path = /ping

vim /etc/php/8.1/fpm/php.ini
post_max_size = 100M
upload_max_filesize = 100M

mkdir -p /data/wordpress/www
vim /data/wordpress/www/phpinfo.php
<?php
phpinfo();
?>
#测试php是否被解析
systemctl start nginx
systemctl start php8.1-fpm

#挂载NFS
echo "10.0.0.135:/data/wordpress/www /data/wordpress/www/ nfs _netdev 0 0" >> /etc/fstab
mount -a

8. mysql-Mast配置

1
2
3
4
5
6
7
8
9
10
11
12
13
14
15
16
17
18
19
20
21
22
23
24
25
26
27
28
29
30
31
32
hostnamectl set-hostname Mysql-Mast
systemctl stop ufw
systemctl disable ufw
iptables -F
apt install mysql-server -y
#如果是编译安装,请注意自定义路径,可能会有不同
sed -i 's/^bind-address/#&/' /etc/mysql/mysql.conf.d/mysqld.cnf
#开启监听,默认是localhost
echo -e "server-id = 131 >> /etc/mysql/mysql.conf.d/mysqld.cnf
#做集群的话每台mysql都需要一个ID识别
systemctl start mysql.service

mysql
mysql> create user backuser@'10.0.0.%' identified by '1234567890';
mysql> grant replication slave on *.* to backuser@'10.0.0.%';
mysql> INSTALL PLUGIN rpl_semi_sync_master SONAME 'semisync_master.so';
#安装master半同步插件
mysql> \! echo "rpl_semi_sync_master_enable" >> /etc/mysql/mysql.conf.d/mysqld.cnf
#开启master半同步策略
mysql> \! systemctl restart mysql
mysql> select @@rpl_semi_sync_master_enabled;
#查看半同步策略是否开启
mysql> reset master;
#重置binlog日志,也可以不重置
mysql> show master status;
#接下来创建wordpress数据库和用户,顺便也可验证主从同步
mysql> create database wordpress;
mysql> create user wordpress@'10.0.0.%' identified by '0987654321';
mysql> grant all on wordpress.* to wordpress@'10.0.0.%';
mysql> select host,user from mysql.user;
#在slave执行该命令,如果有,mysql就完事了,可去lnp配置wordpress

9. mysql-Slave-1配置

1
2
3
4
5
6
7
8
9
10
11
12
13
14
15
16
17
18
19
20
21
22
23
24
25
26
27
28
29
hostnamectl set-hostname Slave-1
systemctl stop ufw
systemctl disable ufw
iptables -F
apt install mysql-server -y
sed -i 's/^bind-address/#&/' /etc/mysql/mysql.conf.d/mysqld.cnf
echo -e "server-id = 132\nread-only = 1" >> /etc/mysql/mysql.conf.d/mysqld.cnf
#实际生产案例中slave应只读
systemctl start mysql.service

mysql
mysql> INSTALL PLUGIN rpl_semi_sync_slave SONAME 'semisync_slave.so';
#安装slave半同步插件
mysql> \! echo "rpl_semi_sync_slave_enabled" >> /etc/mysql/mysql.conf.d/mysqld.cnf
mysql> \! echo "require_secure_transport = 1">> /etc/mysql/mysql.conf.d/mysqld.cnf
#死活连不上,发现开启安全连接秒连,查看master上安全连接是关闭的,百思不得其解,估计只要是master就会默认要求slave开启安全连接
mysql> \! systemctl restart mysql.service
mysql> select @@rpl_semi_sync_slave_enabled;
#查看半同步插件是否启用
mysql> CHANGE MASTER TO MASTER_HOST='10.0.0.131',
MASTER_USER='backuser',
MASTER_PASSWORD='1234567890',
MASTER_LOG_FILE='binlog.000001',
MASTER_LOG_POS=157;
#这里是连接master的配置
mysql> start slave;
#启动slave
mysql> show slave status\G
#如果没有error,就ok了

10. mysql-Slave-2配置

1
2
3
4
5
6
7
8
9
10
11
12
13
14
15
16
17
18
19
20
21
22
23
24
hostnamectl set-hostname Slave-2
systemctl stop ufw
systemctl disable ufw
iptables -F
apt install mysql-server -y
sed -i 's/^bind-address/#&/' /etc/mysql/mysql.conf.d/mysqld.cnf
echo -e "server-id = 133\nread-only = 1" >> /etc/mysql/mysql.conf.d/mysqld.cnf
systemctl start mysql.service


mysql> INSTALL PLUGIN rpl_semi_sync_slave SONAME 'semisync_slave.so';
mysql> \! echo "rpl_semi_sync_slave_enabled" >> /etc/mysql/mysql.conf.d/mysqld.cnf
mysql> \! echo "require_secure_transport = 1">> /etc/mysql/mysql.conf.d/mysqld.cnf
systemctl restart mysql.service

mysql> select @@rpl_semi_sync_slave_enabled;
mysql> CHANGE MASTER TO MASTER_HOST='10.0.0.131',
MASTER_USER='backuser',
MASTER_PASSWORD='1234567890',
MASTER_LOG_FILE='binlog.000001',
MASTER_LOG_POS=157;
mysql> start slave;
mysql> show slave status\G

11. NFS配置

1
2
3
4
5
6
7
8
9
10
11
12
13
14
15
16
17
18
19
20
21
22
23
24
25
26
27
28
29
30
31
32
33
34
35
36
37
38
39
40
41
42
43
44
45
46
47
48
49
50
51
52
53
54
55
56
57
58
59
60
61
62
#nfs配置
hostnamectl set-hostname NFS
systemctl stop ufw
systemctl disable ufw
iptables -F
apt install nfs-kernel-server
mkdir -p /data/{wordpress,tomcat}/{www,www} -p && mkdir /etc/exports.d
vim /etc/exports.d/wordpress.exports
/data/wordpress/www 10.0.0.0/24(rw)
#这里是wordpress的目录

vim /etc/exports.d/tomcat.exports
/data/tomcat/www 10.0.0.0/24(rw)
#这里我把配置文件分开了,也可以放一起

exportfs -v
#查看
exportfs -r
#重读配置文件
chown -R www-data.www-data /data/wordpress
chown -R tomcat.tomcat /data/tomcat
wget http://pan.alybaba.top/soft/sersync2.5.4_64bit_binary_stable_final.tar.gz
#下载监控软件
tar xf sersync2.5.4_64bit_binary_stable_final.tar.gz -C /usr/local/
#解压
ln -s /usr/local/GNU-Linux-x86/sersync2 /usr/local/bin
#软连接
或者
cp -a GNU-Linux-x86 /usr/local/sersync
#改名复制过来,推荐软连接,容错率高点感觉
echo 'PATH=/usr/local/sersync:$PATH' > /etc/profile.d/sersync.sh
#写默认路径
source /etc/profile.d/sersync.sh
#生效
vim /usr/local/sersync/confxml.xml
#文件太长,我只记几个要改的点
<attrib start="true"/>
#这里是监控权限变化,最好开启,默认关闭
<sersync>
<localpath watch="/data">
<!--需要监控的目录-->
<remote ip="10.0.0.136" name="backup"/>
<!--rsync服务器IP,也就是备份服务器地址,name是rsync模块名需一致-->
<!--<remote ip="192.168.8.39" name="tongbu"/>-->
<!--<remote ip="192.168.8.40" name="tongbu"/>-->
</localpath>
<rsync>
<commonParams params="-artuz"/>
<auth start="true" users="rsyncuser" passwordfile="/etc/rsync.pas"/>
<!--这里start需改为trueusers和密码存放位置可自定义-->
<userDefinedPort start="false" port="874"/><!-- port=874 -->
<timeout start="false" time="100"/><!-- timeout=100 -->
<ssh start="false"/>
</rsync>
#其实还可以使用ssh协议,我前面应该用过

echo 123456 > /etc/rsync.pas
chmod 600 /etc/rsync.pas
rsync --password-file=/etc/rsync.pas rsync://rsymcser@10.0.0.136/backup
#测试
nohup sersync2 -dro /usr/local/sersync/confxml.xml &>/dev/null &
#后台运行,记得测试文件同步

11. NFS-BAK配置

1
2
3
4
5
6
7
8
9
10
11
12
13
14
15
16
17
18
19
20
21
22
23
24
25
26
hostnamectl set-hostname NFS-BAK
systemctl stop ufw
systemctl disable ufw
iptables -F
vim /etc/rsyncd.conf
uid = root
gid = root
max connections = 0
ignore errors
exclude = lost+found/
log file = /var/log/rsyncd.log
pid file = /var/run/rsyncd.pid
lock file = /var/run/rsyncd.lock
reverse lookup = no
[backup]
path = /data
comment = backup dir
read only = no
auth users = rsyncuser
secrets file = /etc/rsync.pas

mkdir -p /data/wordpress/www
echo "rsyncuser:123456" > /etc/rsync.pas
chmod 600 /etc/rsync.pas
systemctl restart rsync
#这里做完反手去LNP操作,当然如果同步出问题,请systemctl status rsync,查看连接日志排查

13. Tomcat-1配置

1
2
3
4
5
6
7
8
9
10
11
12
13
14
15
16
17
18
19
20
21
22
23
24
25
26
27
28
29
30
31
32
33
34
35
36
37
38
39
40
41
42
43
44
45
46
47
48
49
50
51
52
53
54
55
56
57
58
59
60
61
62
63
64
65
66
67
68
69
70
71
72
73
74
75
76
77
78
79
80
81
82
83
84
85
86
87
88
89
90
91
92
93
94
95
96
97
98
99
100
101
102
103
104
105
106
107
108
109
110
111
112
113
114
115
116
117
118
119
120
hostnamectl set-hostname Tomcat-1
systemctl stop firewalld.service
systemctl disable firewalld.service
iptables -F
mount /dev/cdrom /mnt
yum install wget rsync -y
#这里我已经提前下载好了tomcat和jdk
tar xf apache-tomcat-8.5.89.tar.gz -C /usr/local/
tar xf jdk-8u371-linux-x64.tar.gz -C /usr/local/
cd /usr/local/
ln -s jdk1.8.0_371 jdk
vim /etc/profile.d/jdk.sh
export JAVA_HOME=/usr/local/jdk
#指定JDK的安装路径
export PATH=$PATH:$JAVA_HOME/bin
#将JDK的bin目录添加到默认PATH
export JRE_HOME=$JAVA_HOME/jre
#指定JRE的安装路径
export CLASSPATH=.:$JAVA_HOME/lib/:$JRE_HOME/lib/
#指定Java类的搜索路径

source /etc/profile.d/jdk.sh
java -v
#测试是否生效
ln -s apache-tomcat-8.5.89 tomcat
echo 'PATH=/usr/local/tomcat/bin:$PATH' > /etc/profile.d/tomcat.sh
#添加tomcat到默认PATH
. /etc/profile.d/tomcat.sh
useradd -r -s /sbin/nologin tomcat
#生产环境最好指定特定统一用户,-r是系统用户,也就是id为1000以下
chown -R tomcat.tomcat /usr/local/tomcat/
echo 'JAVA_HOME=/usr/local/jdk' > /usr/local/tomcat/conf/tomcat.conf
vim /lib/systemd/system/tomcat.service
[Service]
Type=forking

EnvironmentFile=/usr/local/tomcat/conf/tomcat.conf
#Environment=JAVA_HOME=/usr/local/jdk
#如果没有写配置文件可启用此选项
ExecStart=/usr/local/tomcat/bin/startup.sh
ExecStop=/usr/local/tomcat/bin/shutdown.sh
PrivateTmp=true
User=tomcat
Group=tomcat
[Install]
WantedBy=multi-user.target

systemctl daemon-reload
systemctl start tomcat.service
systemctl status tomcat.service
rsync -a ./jdk1.8.0_371 root@10.0.0.205:/usr/local/
rsync -a ./apache-tomcat-8.5.89 root@10.0.0.205:/usr/local/
wget wget -O jpress-v5.1.0.tar.gz 'https://gitee.com/JPressProjects/jpress/repository/archive/v5.1.0?format=tar.gz'
tar xf jpress-v5.1.0.tar.gz
cd jpress-v5.1.0/
yum install maven
#jave编译器,奇怪的是我装这个的时候,附带给我来了一个openjdk8版本的全家桶
vim /etc/maven/settings.xml
<mirror>
<id>nexus-aliyun</id>
<mirrorOf>*</mirrorOf>
<name>Nexus aliyun</name>
<url>http://maven.aliyun.com/nexus/content/groups/public</url>
</mirror>
#在mirrors里添加这个镜像,主要是编译的时候加速用

mvn clean install package -Dmaven.test.skip=true
#编译语句
mv /usr/local/tomcat/webapps/ROOT /usr/local/tomcat/webapps/ROOT1
#把root移走,默认读取的是root下的内容
cp starter-tomcat/target/starter-tomcat-5.0.war /usr/local/tomcat/webapps/ROOT.war
#把jpress移进来,改名ROOT
chown tomcat.tomcat -R /usr/local/tomcat/webapps/
vim /usr/local/tomcat/conf/server.xml
<Host name="localhost" appBase="/data/tomcat/www/webapps"
#这里我修改到其他的目录,方便统一挂载NFS

mkdir -p /data/tomcat/www/webapps/
#如果没有目录重启会报错
chown tomcat.tomcat /data -R
cp -a /usr/local/tomcat/webapps/* ./
systemctl restart tomcat
rsync ./* -a root@10.0.0.135:/data/tomcat/www/webapps/
#跟LNP一样,把文件传至nfs
rm -rf ./*
echo "10.0.0.135:/data/tomcat/www/webapps /data/tomcat/www/webapps nfs _netdev 0 0" >> /etc/fstab
#写nfs挂载配置
yum install nfs-utils -y
#这里报错了,因为这里用的rocky,没有安装nfs,需要安装一下
systemctl daemon-reload
mount -a

#同时jpress只支持5.6和5.7的mysql,那么其实只要把master换为5.7就行了,下面是方法
#ubuntu
apt install software-properties-common
add-apt-repository -y ppa:ondrej/mysql-5.7
apt update
apt install mysql-server-5.7
#rhel
vim /etc/yum.repos.d/mysql5.7.repo
[mysql5.7]
#名随意
name=MySQL 5.7
#随意也要见名知意
baseurl=http://repo.mysql.com/yum/mysql-5.7-community/el/7/$basearch/
#仓库链接
enabled=1
#是否启用,1为启用
gpgcheck=0
#是否检查gpg密钥,这里我就不检查了

yum repolist -v
#刷新仓库包,顺便看下仓库配置是否出从
yum install mysql-community-server

#然后也是一样配置账号密码权限
mysql
mysql> create user jpress@'10.0.0.%' identified by '123456';
mysql> grant all on jpress.* to jpress@'10.0.0.%';

14. Tomcat-2配置

1
2
3
4
5
6
7
8
9
10
11
12
13
14
15
16
17
18
19
20
21
22
23
24
25
26
27
28
29
30
31
32
33
34
35
36
37
38
39
40
41
42
43
44
45
46
47
48
49
50
hostnamectl set-hostname Tomcat-2
systemctl stop firewalld.service
systemctl disable firewalld.service
iptables -F
mount /dev/cdrom /mnt
yum install wget rsync -y
cd /usr/local/
ln -s jdk1.8.0_371 jdk
vim /etc/profile.d/jdk.sh
export JAVA_HOME=/usr/local/jdk
export PATH=$PATH:$JAVA_HOME/bin
export JRE_HOME=$JAVA_HOME/jre
export CLASSPATH=.:$JAVA_HOME/lib/:$JRE_HOME/lib/


source /etc/profile.d/jdk.sh
java -v
ln -s apache-tomcat-8.5.89 tomcat
echo 'PATH=/usr/local/tomcat/bin:$PATH' > /etc/profile.d/tomcat.sh
. /etc/profile.d/tomcat.sh
useradd -r -s /sbin/nologin tomcat
chown -R tomcat.tomcat /usr/local/tomcat/
echo 'JAVA_HOME=/usr/local/jdk' > /usr/local/tomcat/conf/tomcat.conf
vim /lib/systemd/system/tomcat.service
[Service]
Type=forking

EnvironmentFile=/usr/local/tomcat/conf/tomcat.conf
#Environment=JAVA_HOME=/usr/local/jdk
#如果没有写配置文件可启用此选项
ExecStart=/usr/local/tomcat/bin/startup.sh
ExecStop=/usr/local/tomcat/bin/shutdown.sh
PrivateTmp=true
User=tomcat
Group=tomcat
[Install]
WantedBy=multi-user.target

systemctl daemon-reload
systemctl start tomcat.service
systemctl status tomcat.service
mkdir -p /data/tomcat/www/webapps/
chown tomcat.tomcat /data -R
vim /usr/local/tomcat/conf/server.xml
<Host name="localhost" appBase="/data/tomcat/www/webapps"

echo "10.0.0.135:/data/tomcat/www/webapps /data/tomcat/www/webapps nfs _netdev 0 0" >> /etc/fstab
yum install nfs-utils -y
systemctl daemon-reload
mount -a

15. 配置小坑总结

到这里我们的高服务大致就完成了,但是还是有点小问题,因为 keepalived 配置是轮询,而jpress又有验证码,导致登录不进去,我只好把 keepalived 的 persistence_timeout 开启(自定义多长时间访问同一台机器配置项),但是这个也不能完全解决问题,得使用 sieesion 会话保存解决,感兴趣的可自行尝试。同时浏览器会有缓存,导致轮询不正常,我还以为是权重问题,发现自己是 rr 算法(跟nginx搞混了),要配置成wrr,权重才会生效….然后也出现了很多小问题,比如rhel系列必须关闭 selinux,否则 nginx 无法配置转发,机器重启后还是得 iptables -F 刷一下,我忘记 disable 防火墙,机器重启后导致防火墙自启等等。然后那个后端nginx proxy我临时配的下一跳地址,老是会自动删除,导致 user 访问时无法接收到回包,我一度认为是LVS配置出问题,甚至把 keepalived 删除了,直接使用 ipvsadm 配置……这个 IP 配置建议还是写配置文件。所以很多细节一定要注意,敲多了,可根据实际生产环境写流水线脚本。这个 VPN 和 jumpserver 因为时间问题就先不看了,jumpserver 环境其实很简单,官方文档讲的很清晰(ps:主要是有脚本,真舒服),最后说的就是这个NFS其实是存在较大隐患的,建议采用其他分布式文件系统解决,如 Ceph,HDFS,GlusterFS 等等。然后就是域名访问wordpress访问的时候会出现IP地址,是因为我在初始主机配置的时候填写的IP,这个要注意,如果想是用域名访问,请填写域名。文中的vim请敲 :wq保存文件。

16. 架构总结优缺点

优点:

1. 高可用性:通过 Keepalived 实现主备切换,提供持续的服务可用性,减少因服务器故障而导致的服务中断时间。

2. 负载均衡:通过 LVS-NAT 和 Nginx 实现负载均衡,合理分配请求负载,提高系统的整体性能和响应能力。

3. 扩展性:通过主从复制和负载均衡的方式,可以方便地扩展服务器数量,增加系统的处理能力和容量。

4. 弹性和容错性:当某个服务器故障时,系统可以自动切换到备份服务器,保证服务的持续可用性。

缺点:

1. 复杂性:这个架构涉及到多个组件和配置,需要一定的技术知识和经验来正确配置和管理。复杂性可能增加系统的部署和维护的难度。

2. 单点故障:虽然采用了主备切换和负载均衡的方式提高了系统的可用性,但是NFS和mysql始终是一个单点故障,需要值得深思。

3. 数据同步延迟:在主从复制的环境下,从服务器可能存在一定的数据同步延迟,这意味着在主服务器发生故障时,从服务器可能会丢失一部分数据。

4. 配置和管理复杂性:由于涉及多个组件和配置,需要更多的时间和精力来配置、监控和管理整个系统。

建议:

1. 建议mysql集群采用MHA解决单点故障,再加上mycat或者proxymysql等数据库中间件,更进一步提高高可用

2. NFS方案可替换

3. 因地制宜,提前规划,根据生产环境实际情况进行符合未来发展的架构

4. 少个普罗米修斯,缺个深信服,差个存储session的数据库,如果还需要内部仓可使用Nexus