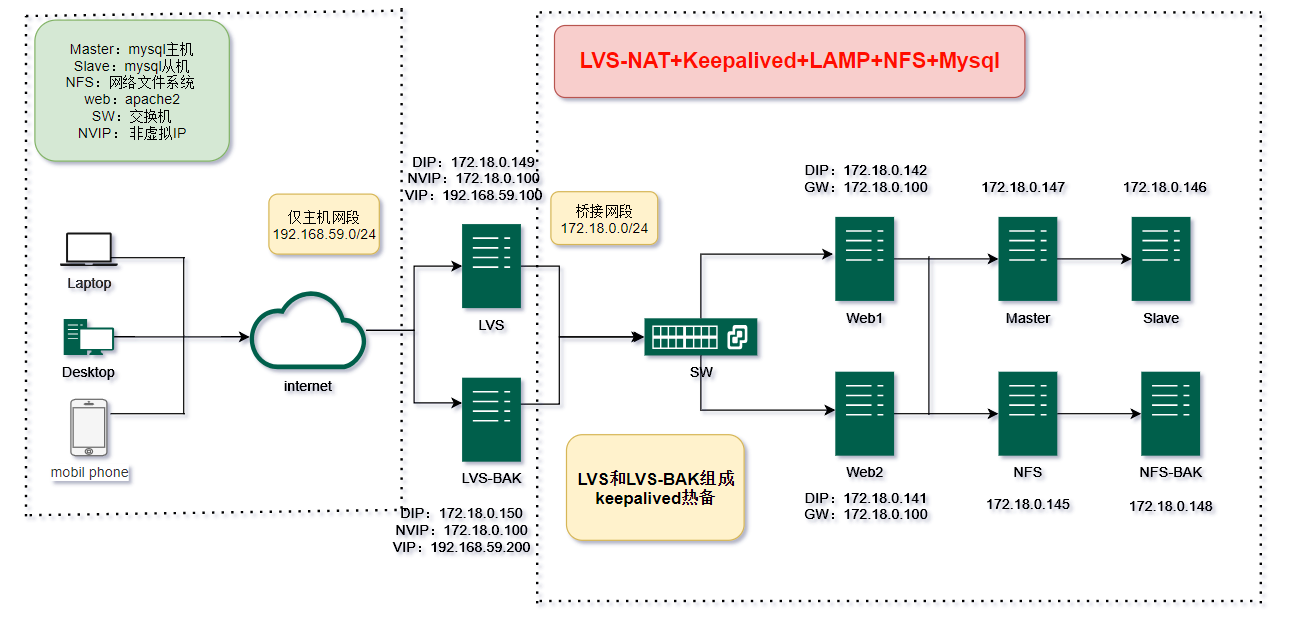
LVS-NAT+Keepalived+LAMP+NFS+Mysql

架构图如下

LVS-NAT+Keepalived高可用

LVS

1
2
3
4
5
6
7
8
9
10
11
12
13
14
15
16
17
18
19
20
21
22
23
24
25
26
27
28
29
30
31
32
33
34
35
36
37
38
39
40
41
42
43
44
45
46
47
48
49
50
51
52
53
54
55
56
57
58
59
60
61
62
63
64
65
66
67
68
69
70
71
72
73
74
75
76
77
78
79
80
81
82
83
84
85
86
87
88
89
90
91
92
93
94
95
96
97
98
99
100
101
102
103
104
105
106
107
108
109
110
111
112
hostnamectl set-hostname LVS
vim /etc/netplan/00-installer-config.yaml
network:
ethernets:
ens33:
dhcp4: true
ens37:
dhcp4: no
addresses:
- 192.168.59.100/24

version: 2
#这里偷懒了。。
apt update && apt install ipvsadm keepalived
echo "1" > /proc/sys/net/ipv4/ip_forward
vim /etc/keepalived/keepalived.conf
! Configuration File for keepalived
global_defs {
notification_email {
you.example@mail.com
}
notification_email_from you.example@mail.com
smtp_server mail.domob.cn
smtp_connect_timeout 30
router_id LVS_1
}
vrrp_instance VI_1 {
state MASTER
interface ens37
virtual_router_id 51
priority 100
advert_int 1
authentication {
auth_type PASS
auth_pass 1111
}
virtual_ipaddress {
192.168.59.100
192.168.59.200
}
}
vrrp_instance LAN_GATEWAY {
state MASTER
interface ens33
virtual_router_id 62
priority 100
advert_int 1
authentication {
auth_type PASS
auth_pass 1111
}
virtual_ipaddress {
172.18.0.100
}
}
virtual_server 192.168.59.100 80{
delay_loop 6
lb_algo rr
lb_kind NAT
nat_mask 255.255.255.0
persistence_timeout 50
protocol TCP

real_server 172.18.0.142 80 {
weight 1
TCP_CHECK {
connect_timeout 10
nb_get_retry 3
delay_before_retry 3
connect_port 80
}
}
real_server 172.18.0.141 80 {
weight 1
TCP_CHECK {
connect_timeout 10
nb_get_retry 3
delay_before_retry 3
connect_port 80
}
}
}
virtual_server 192.168.59.200 80{
delay_loop 6
lb_algo rr
lb_kind NAT
nat_mask 255.255.255.0
persistence_timeout 50
protocol TCP

real_server 172.18.0.142 80 {
weight 1
TCP_CHECK {
connect_timeout 10
nb_get_retry 3
delay_before_retry 3
connect_port 80
}
}
real_server 172.18.0.141 80 {
weight 1
TCP_CHECK {
connect_timeout 10
nb_get_retry 3
delay_before_retry 3
connect_port 80
}
}
}
#keepalived会根据配置文件配置LVS和LVS-BAK的ipvsadm
systemctl start keepalived
systemctl status keepalived

LVS-BAK

1
2
3
4
5
6
7
8
9
10
11
12
13
14
15
16
17
18
19
20
21
22
23
24
25
26
27
28
29
30
31
32
33
34
35
36
37
38
39
40
41
42
43
44
45
46
47
48
49
50
51
52
53
54
55
56
57
58
59
60
61
62
63
64
65
66
67
68
69
70
71
72
73
74
75
76
77
78
79
80
81
82
83
84
85
86
87
88
89
90
91
92
93
94
95
96
97
98
99
100
hostnamectl set-hostname LVS-BAK
#ip配置同LVS
apt update && apt install ipvsadm keepalived
echo "1" > /proc/sys/net/ipv4/ip_forward
vim /etc/keepalived/keepalived.conf
! Configuration File for keepalived
global_defs {
notification_email {
you.example@mail.com
}
notification_email_from you.example@mail.com
smtp_server mail.domob.cn
smtp_connect_timeout 30
router_id LVS_2
}
vrrp_instance VI_1 {
state BACKUP
interface ens37
virtual_router_id 50
priority 99
advert_int 1
authentication {
auth_type PASS
auth_pass 1111
}
virtual_ipaddress {
192.168.59.100
192.168.59.200
}
}
vrrp_instance LAN_GATEWAY {
state BACKUP
interface ens33
virtual_router_id 62
priority 99
advert_int 1
authentication {
auth_type PASS
auth_pass 1111
}
virtual_ipaddress {
172.18.0.100
}
}
virtual_server 192.168.59.100 80{
delay_loop 6
lb_algo rr
lb_kind NAT
nat_mask 255.255.255.0
persistence_timeout 50
protocol TCP

real_server 172.18.0.142 80 {
weight 1
TCP_CHECK {
connect_timeout 10
nb_get_retry 3
delay_before_retry 3
connect_port 80
}
}
real_server 172.18.0.141 80 {
weight 1
TCP_CHECK {
connect_timeout 10
nb_get_retry 3
delay_before_retry 3
connect_port 80
}
}
}
virtual_server 192.168.59.200 80{
delay_loop 6
lb_algo rr
lb_kind NAT
nat_mask 255.255.255.0
persistence_timeout 50
protocol TCP

real_server 172.18.0.142 80 {
weight 1
TCP_CHECK {
connect_timeout 10
nb_get_retry 3
delay_before_retry 3
connect_port 80
}
}
real_server 172.18.0.141 80 {
weight 1
TCP_CHECK {
connect_timeout 10
nb_get_retry 3
delay_before_retry 3
connect_port 80
}
}
}
systemctl start keepalived
systemctl status keepalived

Web1

1
2
3
4
5
6
7
8
9
10
11
12
13
14
15
16
17
hostnamectl set-hostname web1
apt update && apt install apache2 php-mysql php nfs-kernel-server libapache2-mod-php zip -y
ufw allow 80/tcp
wget https://cn.wordpress.org/latest-zh_CN.zip
route del default
route add default gw 172.18.0.100
unzip wordpress-6.2-zh_CN.zip &>/dev/null
rm /var/www/html/index.html
mv wordpress/* /var/www/html/
chown -R www-data.www-data wordpress
#在配置完mysql后,请访问80端配置好wordpress连接
systemctl restart apache2.service

#配置完NFS后才能做以下配置
rsync -av /var/www/html/* 172.18.0.145:/data/wordpress
echo "172.18.0.145:/data/wordpress /var/www/html/ nfs _netdev 0 0" > /etc/fstab
mount -a

Web2

1
2
3
4
5
6
7
8
hostnamectl set-hostname web2
apt update && apt install apache2 php-mysql php nfs-kernel-server libapache2-mod-php zip -y
ufw allow 80/tcp
route del default
route add default gw 172.18.0.100
#web2同理
echo "172.18.0.145:/data/wordpress /var/www/html/ nfs _netdev 0 0" > /etc/fstab
mount -a

Master

1
2
3
4
5
6
7
8
9
10
11
hostnamectl set-hostname Master
apt update && apt install mysql-server -y
ufw allow 3306/tcp
sed -i 's/^bind-address/#&/' /etc/mysql/mysql.conf.d/mysqld.cnf
echo "server-id = 147" >> /etc/mysql/mysql.conf.d/mysqld.cnf
systemctl start mysql
create user backuser@'172.18.0.%' identified by '1234567890';
grant replication slave on *.* to backuser@'172.18.0.%';
reset master;
create user wordpress@'172.18.0.%' identified by 'wordpress123'
grant all on wordpress.* to wordpress@'172.18.0.%'

Slave

1
2
3
4
5
6
7
8
9
10
11
12
13
14
15
16
apt update &&  apt install mysql-server -y
ufw allow 3306/tcp
sed -i 's/^bind-address/#&/' /etc/mysql/mysql.conf.d/mysqld.cnf
echo -e "server-id = 146\nread-only = 1" >> /etc/mysql/mysql.conf.d/mysqld.cnf
systemctl start mysql
#复制以下语句
CHANGE MASTER TO MASTER_HOST='172.18.0.147',
MASTER_USER='backuser',
MASTER_PASSWORD='1234567890',
MASTER_LOG_FILE='binlog.000001',
MASTER_LOG_POS=157;
#主从同步配置,然后去master创建wordpress用户,这里图省事,也可以用其他的写入语句检测主从同步
show slave status\G
#查看slave同步状态
select user,host from mysql.user;
#测试woedpress账号是否同步

NFS

1
2
3
4
5
6
7
8
9
10
11
12
13
14
15
16
17
18
19
20
21
22
23
24
25
26
27
28
29
30
31
32
33
34
35
36
37
38
39
40
41
42
43
44
45
46
47
48
49
50
51
52
53
54
55
56
57
58
59
60
61
62
63
64
65
66
67
68
69
70
71
72
73
74
75
76
77
78
79
80
81
82
83
84
85
86
87
88
89
90
91
92
93
hostnamectl set-hostname NFS
mkdir -p /data/wordpress ; mkdir /etc/exports.d ;chown -R www-data.www-data /data
vim /etc/exports.d/wordpress.exports
/data/wordpress 172.18.0.0/24(rw)
:wq

exportfs -r
exportfs -v
systemctl restart nfs-server.service
wget https://storage.googleapis.com/google-code-archive-downloads/v2/code.google.com/sersync/sersync2.5.4_64bit_binary_stable_final.tar.gz
tar xf sersync2.5.4_64bit_binary_stable_final.tar.gz
cp -a GNU-Linux-x86 /usr/local/sersync
echo 'PATH=/usr/local/sersync:$PATH' > /etc/profile.d/sersync.sh
source /etc/profile.d/sersync.sh
vim /usr/local/sersync/confxml.xml
<?xml version="1.0" encoding="ISO-8859-1"?>
<head version="2.5">
<host hostip="localhost" port="8008"></host>
<debug start="false"/>
<fileSystem xfs="false"/>
<filter start="false">
<exclude expression="(.*)\.svn"></exclude>
<exclude expression="(.*)\.gz"></exclude>
<exclude expression="^info/*"></exclude>
<exclude expression="^static/*"></exclude>
</filter>
<inotify>
<delete start="true"/>
<createFolder start="true"/>
<createFile start="false"/>
<closeWrite start="true"/>
<moveFrom start="true"/>
<moveTo start="true"/>
<attrib start="true"/>
<modify start="false"/>
</inotify>

<sersync>
<localpath watch="/data/wordpress">
<!--本地需要监控的目录-->
<remote ip="172.18.0.148" name="backup"/>
<!--rsync服务器IP,以及rsync模块名-->
<!--<remote ip="192.168.8.39" name="tongbu"/>-->
<!--<remote ip="192.168.8.40" name="tongbu"/>-->
</localpath>
<rsync>
<commonParams params="-artuz"/>
<auth start="true" users="rsyncuser" passwordfile="/etc/rsync.pas"/>
<!--远程用户名,以及密码文件-->
<userDefinedPort start="false" port="874"/><!-- port=874 -->
<timeout start="false" time="100"/><!-- timeout=100 -->
<ssh start="false"/>
</rsync>
<failLog path="/tmp/rsync_fail_log.sh" timeToExecute="60"/><!--default every 60mins execute once-->
<crontab start="false" schedule="600"><!--600mins-->
<crontabfilter start="false">
<exclude expression="*.php"></exclude>
<exclude expression="info/*"></exclude>
</crontabfilter>
</crontab>
<plugin start="false" name="command"/>
</sersync>

<plugin name="command">
<param prefix="/bin/sh" suffix="" ignoreError="true"/> <!--prefix /opt/tongbu/mmm.sh suffix-->
<filter start="false">
<include expression="(.*)\.php"/>
<include expression="(.*)\.sh"/>
</filter>
</plugin>

<plugin name="socket">
<localpath watch="/opt/tongbu">
<deshost ip="192.168.138.20" port="8009"/>
</localpath>
</plugin>
<plugin name="refreshCDN">
<localpath watch="/data0/htdocs/cms.xoyo.com/site/">
<cdninfo domainname="ccms.chinacache.com" port="80" username="xxxx" passwd="xxxx"/>
<sendurl base="http://pic.xoyo.com/cms"/>
<regexurl regex="false" match="cms.xoyo.com/site([/a-zA-Z0-9]*).xoyo.com/images"/>
</localpath>
</plugin>
</head>

echo 123456 > /etc/rsync.pas
chmod 600 /etc/rsync.pas

#配置完rsync服务器后才能进行以下步骤
rsync --password-file=/etc/rsync.pas rsync://rsymcser@172.18.0.148/backup
#测试连通性,如果报错,请检查rsync配置是否出错
sersync2 -dro /usr/local/sersync/confxml.xml
#开启rsync自动监控

NFS-BAK

1
2
3
4
5
6
7
8
9
10
11
12
13
14
15
16
17
18
19
20
21
22
23
hostnamectl set-hostname NFS-BAK
#我所有主机已经安装了rsync服务了
vim /etc/rsyncd.conf
uid = root
gid = root
max connections = 0
ignore errors
exclude = lost+found/
log file = /var/log/rsyncd.log
pid file = /var/run/rsyncd.pid
lock file = /var/run/rsyncd.lock
reverse lookup = no
[backup]
path = /data/wordpress/
comment = backup dir
read only = no
auth users = rsyncuser
secrets file = /etc/rsync.pas

mkdir -p /data/wordpress/
echo "rsyncuser:123456" > /etc/rsync.pas
chmod 600 /etc/rsync.pas
systemctl restart rsync

测试:

1
2
3
4
5
6
7
8
9
10
11
#在NFS-BAK上查看
ls /data/wordpress
#此刻没有意外的话你已经同步了 172.18.0.145上 NFSserver 下 /data/wordpress 的文件
tree /data/wordpress/wp-content/uploads/
#然后在Web1或Web2的wordpress上传图片,查看172.18.0.148也就是NFS-BAK是否同步

#在LVS上down掉keepalived
systemctl stop keepalived
#在lvs上停掉keepalived服务,查看NVIP是否漂移,备份机是否生效
curl 172.18.0.100
#不出意外的话,依旧会返回wordpress网站信息

总结:

到这里我们就完成了LVS-NAT和keepalived的高可用和负载均衡配置方案了,当然这仅仅是NAT,还有DR和tunnel以及fulltunnel (需要编译内核)模式。这种架构的优点是具有高可用性和负载均衡能力,可以在服务器出现故障时自动切换到其他正常的服务器上,从而保证服务的稳定性和可用性。此外,通过NFS文件共享woredpress的文件,还实现了数据的共享和同步,提高了系统的可靠性和灵活性。同时mysql还可以进行扩展,这里就不再做过多演示。那么问题来了,如果NFS-SERVER挂机怎么办?GG